
- Section 6.1.1, How Automatic Hybrid Azure AD Join Works
- Section 6.1.2, Setting Up Automatic Hybrid Azure AD Join for Windows Devices
- Section 6.1.3, Automatic Hybrid Azure AD Join for Windows Downlevel Devices
- Section 6.1.4, How SSO to Microsoft Azure Applications Work
- Section 6.1.5, Troubleshooting Automatic Hybrid Azure AD Join
6.1.1How Automatic Hybrid Azure AD Join Works#
When a Windows device logs in to the local AD domain, the device registration with Azure AD starts. The device is synchronized by using AD Connect from the local AD to Azure AD. Using Azure Active Directory Authentication Libraries (ADAL) based authentication, hybrid Azure AD allows SSO to enterprise applications through Kerberos Ticket-Granting Ticket (TGT), and OAuth 2.0 tokens used for Office 365 applications. The following diagram explains how automatic registration of Windows devices to Azure AD works:
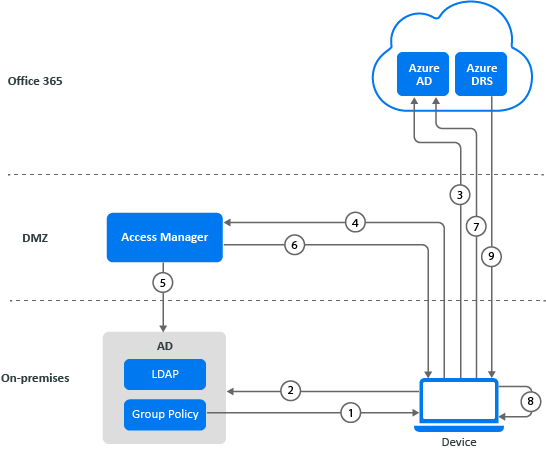
- AD triggers a group policy to the Windows 10 client for initiating the device registration.
- The device queries AD for the Azure AD tenant information. The Azure AD Connect application gathers the tenant information stored in AD.
- An OAuth code authentication request is sent to Azure AD, and Azure AD redirects the request to Access Manager Identity Server.
- The device reaches Identity Server’s Integrated Windows Authentication (IWA) STS endpoint with a device account as an identity by using Windows integrated authentication.
- Identity Server uses Kerberos to validate the device identity with the AD domain.
- After successful authentication, Identity Server sends a token with claim details.
- The token is sent to Azure AD. Azure AD validates federation settings with Access Manager. After successful validation, it sends the token to the client for device registration.
- The device creates a Private/Public key pair and sends the certificate-signing request along with the token received from Azure AD to Azure Device Registration Service (DRS).
- Azure DRS creates a certificate and a device object with its certificate thumbprint and returns the certificate to the client. The client stores the certificate and uses it for the next interaction with Azure AD or Office 365 services.
For more information, see How To: Plan your hybrid Azure Active Directory join implementation.
6.1.2Setting Up Automatic Hybrid Azure AD Join for Windows Devices#
Perform the following tasks to set up automatic device registration for Windows devices:
- Preparing Azure AD for Automatic Hybrid Azure AD Join
- Configuring Access Manager for Automatic Hybrid Azure AD Join
- Validating Hybrid Azure AD Join
- Verifying Device Registration Status
Prerequisites for Automatic Hybrid Azure AD Join#
You must complete the following tasks before implementing hybrid Azure AD join:
- Be acquainted with Introduction to device identity management in Azure Active Directory.
- Review supported devices. The following list includes the supported Windows current versions:
- Windows 10
- Windows Server 2016
- Windows Server 2019
- Review things you should know
- Review on-premises AD UPN support for hybrid Azure AD join
Your environment must meet the following requirements:
- Access Manager 4.5 Service Pack 1 or later is installed.
- The federation is established between Access Manager and Office 365 domain with appropriate subscriptions. See Configuring Single Sign-On for Office 365 Services.
- (Optional) Set up SSO from iOS apps to Office 365 services. For more information, see the Knowledge Base article.
- Azure AD Connect is setup for Active Directory synchronization with Azure AD.
Preparing Azure AD for Automatic Hybrid Azure AD Join#
Perform the following tasks to prepare Azure AD for Automatic Hybrid AD Join:
- Installing Azure AD Connect
- Configuring Device Options
- Configuring Enterpriseregistration CNAME on your DNS server
- Enabling Devices to be Registered with Azure AD
Installing Azure AD Connect
Install and configure Azure AD Connect on the Windows Server that you want to make the sync server.
- Download AzureADConnect.msi.
- Launch AzureADConnect.msi.
- Click Customize > Install.
- After the required components are installed, the User sign-in page appears. Select Do not configure.NOTE:If Azure AD Connect is already installed, you can configure it in Azure AD Connect by clicking Change user sign-in > Next.
- On the Connect to Azure AD page, specify your Azure AD global admin account and password.
- On the Sync > Connect Directories > Connect to your Active Directory Domain Service page, perform the following actions:
- In DIRECTORY TYPE, select Active Directory.
- In FOREST, specify the name of the forest.
- Click Add Directory.
- Select Use existing account.
- Specify the Active Directory Domain Services (AD DS) enterprise administrator credentials.
- Click Next.
- On the Sync > Azure AD sign-in > Azure AD sign-in configuration page, select Continue without matching all UPN suffixes to verified domains.
- On the Configure > Ready to configure page, select Start the synchronization process as soon as the configuration completes.
- Click Install.
For detailed information about how to install and configure it, see Custom installation of Azure AD Connect.
Configuring Device Options
- Run Azure AD Connect.
- Under Tasks, select Configure device options.
- Click Next.
- Specify your Azure AD global administrator credentials.
- Select Configure Hybrid Azure AD join.
- Click Next.
- On the Device operating systems page, select the following options:
- Windows 10 or later domain-joined devices
- Supported Windows downlevel domain joined devices
- Click Next.
- On the SCP page, perform the following steps to configure the service connection point for each forest:
- Select the forest.
- Select the authentication service.
- Click Add and specify the enterprise administrator credentials.
- Click Next.
- On the Ready to configure page, click Configure.
Configuring Enterpriseregistration CNAME on your DNS server
For information about how to configure Enterpriseregistration CNAME, see Create DNS records for Office 365 using Windows-based DNS.
Enabling Devices to be Registered with Azure AD
- Log in to the Azure portal as an administrator.
- In the left pane, select Active Directory.
- Under Manage, click Devices > Device Settings.
- Select All for Users may register their devices with Azure AD policy.For more information, see How to manage devices using the Azure Portal.
Configuring Access Manager for Automatic Hybrid Azure AD Join#
- Configure the Active Directory userstore if the existing Active Directory user store’s search context does not contain the computers DN.
- Click Devices > Identity Servers > Edit > Local > User Stores.
- Click New.
- Specify user store’s IP address and credentials, replica details, and add the search context where domain joined computers exists. For example, CN=computers, DC=cloudtest, DC=info.For more information configuring a user store, see Configuring Identity User Stores.
- Create a Kerberos class. See Creating the Authentication Class, Method, and Contract.
- Create a Kerberos method for the existing Kerberos class.
- Click Devices > Identity Servers > Edit > Local > Methods.
- Click New.
- Specify a name, select the Kerberos class, and then select the user store created in Step 1.
- Click OK.
- Configure WS-Trust STS.
- Click Devices > Identity Servers > Edit > WS-Trust > STS Configuration.
- Under Authentication Methods, move the Kerberos method created in Step 3 from Available Authentication Methods to Selected Authentication Methods.
- Click OK.
- Edit the following file:On Linux: /opt/novell/nam/idp/webapps/nidp/WEB-INF/web.xmlOn Windows: C:\Program Files\Novell\Tomcat\webapps\nidp\WEB-INF\web.xml
- Add the NetIQSTS12MEX Servlet with the following details:<servlet> <servlet-name>NetIQSTS12MEX</servlet-name> <jsp-file>/jsp/mex.jsp</jsp-file> <load-on-startup>1</load-on-startup> </servlet> <servlet-mapping> <servlet-name>NetIQSTS12MEX</servlet-name> <url-pattern>/wstrust/sts/mex</url-pattern> </servlet-mapping> <servlet>NOTE:Ensure to comment out the following Servlet mapping:<!– <servlet-mapping> <servlet-name>NetIQSTS</servlet-name> <url-pattern>/wstrust/sts/mex</url-pattern> </servlet-mapping> –>
- Restart Identity Server.
Validating Hybrid Azure AD Join#
You can control what devices can join to Azure AD automatically by using a group policy. To achieve this, perform the steps that are mentioned in Controlled validation of hybrid Azure AD join.
When you complete these steps, domain-joined devices are automatically get registered with Azure AD. When the device restarts, the automatic registration to Azure AD is completed.
Verifying Device Registration Status#
Verifying the Status on a Windows Device
Perform the following steps on the Windows 10 device to check the device registration status:
- Open a Windows PowerShell prompt.
- Run the following command:dsregcmd.exe /status
- Verify that the following parameters have the corresponding values:Parameters under Device State
- Azure DA Joined: YES
- Domain Joined: YES
- WorkplaceJoined: NO
- WamDefaultSet: YES
- Azure AD PRT: YES
Verifying the Status on the Azure Portal
You can verify the status of the device registration on the Azure Portal > Azure Active Directory and Devices.
Or, you can check the status by using the PowerShell command:
- Open Microsoft Azure Active Directory Module for Windows PowerShell.
- Run the following command to connect to your Azure Active Directory tenant:Connect-MsolService
- Specify the Azure AD administrator’s credentials.
- Run the following command:
- To verify the status of all registered devices: Get-MsolDevice -All
- To verify the status of a specific device using DeviceID: Get-MsolDevice -DeviceID “<device_id_value>”
6.1.3Automatic Hybrid Azure AD Join for Windows Downlevel Devices#
For Azure AD device registration, Windows 10 devices use the active STS (WS Trust) workflow whereas Windows downlevel devices use the passive (WS-Federation) workflow. Therefore, the steps to configure automatic hybrid Azure AD join for Windows 10 devices and Windows downlevel devices are different.
Access Manager supports the following Windows downlevel devices:
- Windows 8.1
- Windows Server 2012 R2
- Windows Server 2012
Prerequisites: see Prerequisites for Automatic Hybrid Azure AD Join.
To enable automatic registration for Windows downlevel devices, perform the following steps:
- Prepare Azure AD for automatic hybrid Azure AD join.See Preparing Azure AD for Automatic Hybrid Azure AD Join.
- Configure Access Manager for automatic hybrid Azure AD join.See Configuring Access Manager for Automatic Hybrid Azure AD Join.
- Configure the local Intranet settings for device registration. To prevent the certificate prompts while authenticating a device to Azure AD, add the following URL to the Local Intranet zones:
- Install Microsoft Workplace Join for non-Windows 10 computers.For more information, see Install Microsoft Workplace Join for Windows downlevel computers.
- Validate hybrid Azure AD join. See Validating Hybrid Azure AD Join.
- Verify the registration. See Verifying Device Registration Status.
6.1.4How SSO to Microsoft Azure Applications Work#
The following is the workflow of SSO to Azure applications from a Azure AD joined device:
- The device sends a Kerberos token to Access Manager through the WS-Trust protocol.
- The device generates a certificate signing certificate (CSR) and sends it to Azure DRS and gets signed a certificate for that device.
- The device generates a second certificate to use with the Primary Refresh Token (PRT) by using user credentials.
- The PRT is used for SSO for users when they access Azure AD applications.
6.1.5Troubleshooting Automatic Hybrid Azure AD Join#
Refer to the Microsoft documentation.